Thursday, November 29, 2012

R-34 scale model project...Rudders and elevator flaps fabricated and dry fitted to fins.

The next step was to fabricate the rudders and elevator flaps. These were cut out of 1/32" stock sheet balsa wood, and all the exposed edges and surfaces were laminated with acid free printer paper to give a smooth surface for painting purposes. I drew the paint definition lines on the flaps for where the red, white and blue paint is going to be applied later on.
 I then dry fitted them to the locator pins on the back ends of the fins, and trimmed them for a precise fit.


After they were dry fitted to the model to my satisfaction, I removed them, and fabricated the little counterbalance weights that are fitted on each side of the rudder flaps, as shown in the photo of the tail of the actual ship in the top image.
This bottom photo shows the rudder and elevator flaps completed, ready to paint, and tagged as to where they fit on the model. They will not interchange, as each one of them was precisely fitted  to their respective fin, and will not fit anywhere else.

Note; This ends the reproduction of this thread as I reported it on Airship Modeler, in March of 2012, as this is the point where I stopped working on the model in real time, because of health issues I was having at the time. I will do more posts after I resume work on this model, which should be shortly, during the overwinter months, starting with the fabrication of the control car, and engine gondolas. That will be next, in real time.

Jim.

Wednesday, November 28, 2012

R-34 scale model project... Ring sealer strips applied.

The next step was to give the hull the texture that is kind of unique to this particular airship. The raised lines, or strips that were doped onto the surface of the actual dirigible that covered the edges of the cotton panels that were laced onto the ship's framework. These strips covered those joints where the panels butted up against each other.
On my model. I simulated this by cutting up a sheet of acid free printer paper into 1/16" wide strips, and glued them to the doped tissue paper over each ring on the hull. Where they butted up the gas shaft hoods, I would cut that part out, and have the end of the strip butted up against the hood cover. Same thing for the fins.
After I had them all in place, and they were dry, I applied two more coats of clear model aircraft dope to seal these in on the surface of the hull to make for a more uniform surface for painting purposes.
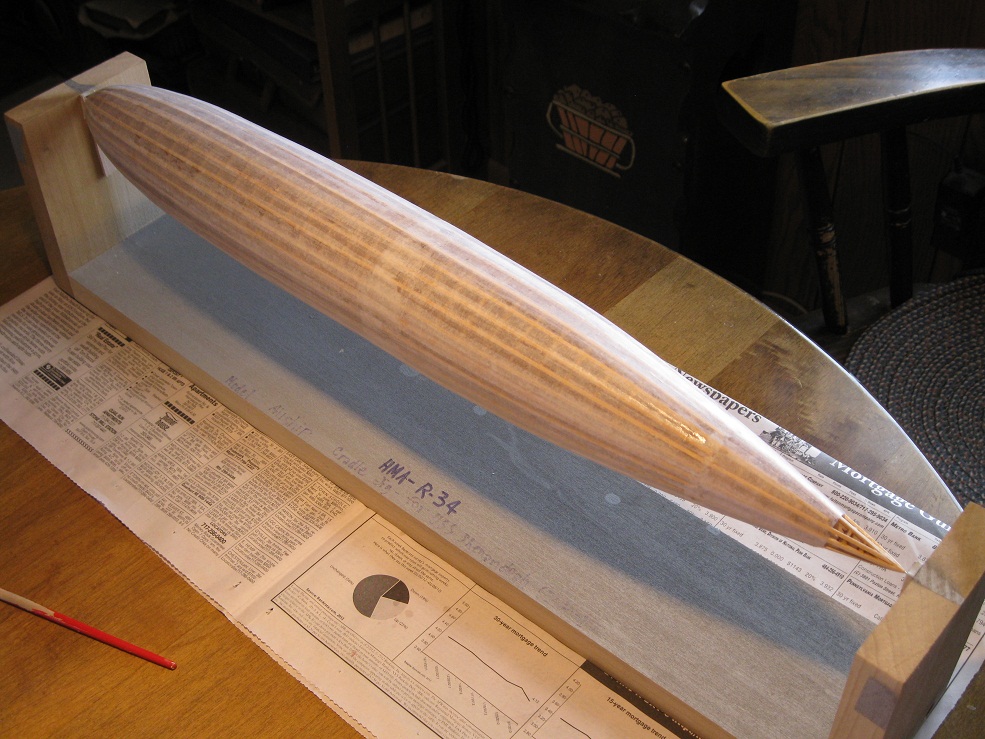
In these subsequent pictures you can see the gas shaft hoods on the top of the ship, as well as the overall aesthetic effect applying these little strips has on giving this model a much more realistic looking texture.


Strips were made from printer paper, cut with a straight edge on a wooden cutting board, into about 1/16" wide strips, and wrapped around the hull over every ring.
Close-up showing the texture of the model. It's really starting to look like the R-34, now!
Isolated detail shot of the completed but not painted hull assembly.


Jim.

R-34 scale model project...Fins fabricated and installed. Gas shaft vent hoods also installed.


Fabrication of the tail fins for this model was pretty straightforward. I pretty much just traced the shape of them off the plan onto the 1/16" stock sheet balsa wood, and cut them out. I then laminated acid free paper to the surfaces of the wood to give a smooth finish, and to strengthen the structural integrity of the fins so they  would not break off to easy along the grain lines. Before I glued the fins on the hull, after this, I cut the heads off of straight pins, and shoved the cut off ends into the trailing edge of the fin. I put two pins in each fin. These  serve as locator pins for holding the rudders and elevator flaps in place on the back edges of the fins, later.

You will note in this photo of the tail end of the actual ship that the horizontal fins are not level. They have a purposely added upward 4.5 degree dihedral angle added to them in relation to the centerline axis of the hull. The purpose behind this upward angle of these horizontal fins is to provide aerodynamic (extra) lift for the tail end of the ship as it is moving through the air.
I added this feature to my model, as you can see in this image below. I realize that I made the fins thicker in relation to the hull than what they actually were in real life. That is because I try to build some durability into my models.
Even though you can't see them yet in these images, I also added the gas shaft hoods, which on the actual ship were used to vent hydrogen out of the gas cells and out of the top of the ship, if it was flying too "light" They were fitted and served in between two gas cells on the ring frames of the hull. They were, for the model fabricated out of balsa wood, and shaped into small thin circular  discs. The first two discs are mounted on opposite sides, staggered on the nose, on every other ring, and the remaining discs run right down the very top of the ship on every fourth ring, staggered on either side of the top longitudinal stringer, to the front edge of the upper vertical fin. These pictures showing this will be shown in the next post.

Jim.

Friday, November 23, 2012

R-34 scale model project...Minor damage/ persistant buckles/wrinkles in tissue surface!


After I was done applying the tissue paper, I had to water it down. This has the effect of when it dries out, it shrinks the paper, so that the surface of the hull is nice and smooth. Unfortunately this also greatly weakens the paper while it is wet, and in some places on the hull, I blasted holes through the paper with the water spray atomizer, from spraying it too hard. When it dried out, I had to get the dope and the extra paper out to patch the holes. Then I would re wet the patched area down to draw it tight. In some of these areas, this would cause the surrounding tissue to wrinkle. If that would happen, I had to apply more water around the patch on the surrounding tissue only, to try and draw that out. If that did not work, I had to cut the tissue out in that area in that gore, and recover it. That usually worked. If the ajoining paper would buckle, I had to re wet it repeatedly, and force dry it with a hand held hair dryer, to draw it out. I had to use repeated , and varying methods to get all the wrinkles out of the paper, until the whole surface of the hull was nice and smooth to the eye. Once I achieved that, I applied four sealer coats of clear dope to make the surface waterproof. This also has the effect of "plasticising" the surface, to give a nice smooth finish that fills in all the overlap seams in the paper that will take a nice coat of paint when I get to that point.


 These two images show the offending areas patched and drawn out smooth, ready to apply the clear seal coats of dope.

 These last three images show the hull surfaces all drawn out, ready to apply the seal coats of dope.
  Nice and smooth to my satisfaction!
Next step after this: Fin fabrication and installation.
Actual airship in 1919.


Jim.

Tuesday, November 20, 2012

R-34 scale model project...Covering the stern.

I applied the tissue paper on the stern in the same way as I did the bow. Only I could not cover ther stern all the way to the tip of the tail. That is because the number of sides , or gores,(facets, if you will) drops from 25 sides to 14 sides where the fins start, to only 7 sides where the fins end to the tip of the tail. These short sections, in order for the paper to not wrinkle, must be done separately. Other than that, it is done the same way, one gore at a time.

 Follow along as I complete covering the model's hull, here.


 Mid-stern completed!


 Fin area of stern completed.

 An extreme closeup of the tip of the stern showing the still exposed tail framework.

 Covering completed!
Next step: Shrink the tissue paper to draw it taut and smooth.

Jim.

Monday, November 19, 2012

R-34 scale model project...Covering the bow.

Tissue paper was applied in narrow strips, one gore at a time. The strips were cut slightly wider than the space that needed to be covered. If I try to cover more than half the hull at a time, I do not have enough time to wet down the frame with the dope as an adhesive on the frame, to apply the paper, as the stuff dries very quickly. Usually within 4 minutes from the time it is brushed on. I cut each strip ahead of time, applied the dope, then laid the paper on the two stringers, making sure it is put on as smooth and wrinkle free as possible without tearing it. This stuff is extremely delicate to work with, it tears easy! After the strip is in place, I had to brush more dope over the area of the paper where it makes contact with the strip. This gets the adhesive the whole way through the paper, and when it is dry, locks it on the frame. Also to double make sure that it stays on, I have to rub the contact area down with my fingertip to make sure also that the paper has indeed adhered to the frame. I then apply strips to every other gore until I get the whole way around the hull. Then I go one more time around, and start to cover the gores in between the ones I covered the first time around. Where the paper overlaps, those seams must be sealed with dope to smooth the seams over, and make the cover look smooth.
 Follow along in this chronological sequence of images as I cover the bow half of the hull.
 As I was applying the tissue paper strips, I had to be really careful NOT to cover the whole strip of paper with the dope, as the middle of the strip between the stringers needs to be unsealed for shrinkage purposes after the entire hull is covered to draw the paper tight to give the model a tight smooth surface, ready for sealing and painting down the road, after it is shrunk. I will explain this later.

 Bow covering completed!


Model aircraft dope is very volatile, and you need to have very good ventilation air flow while working with this stuff as it really reeks bad while you are working with it.


Jim.

Pensupreme and other vintage milk cartons... do people collect these?

 In the last year, I have noticed how a lot of people collect vintage glass milk bottles, which I remember when I was a kid, how the milkman...