Sunday, November 18, 2012

R-34 scale model project... Building the other side of the hull.

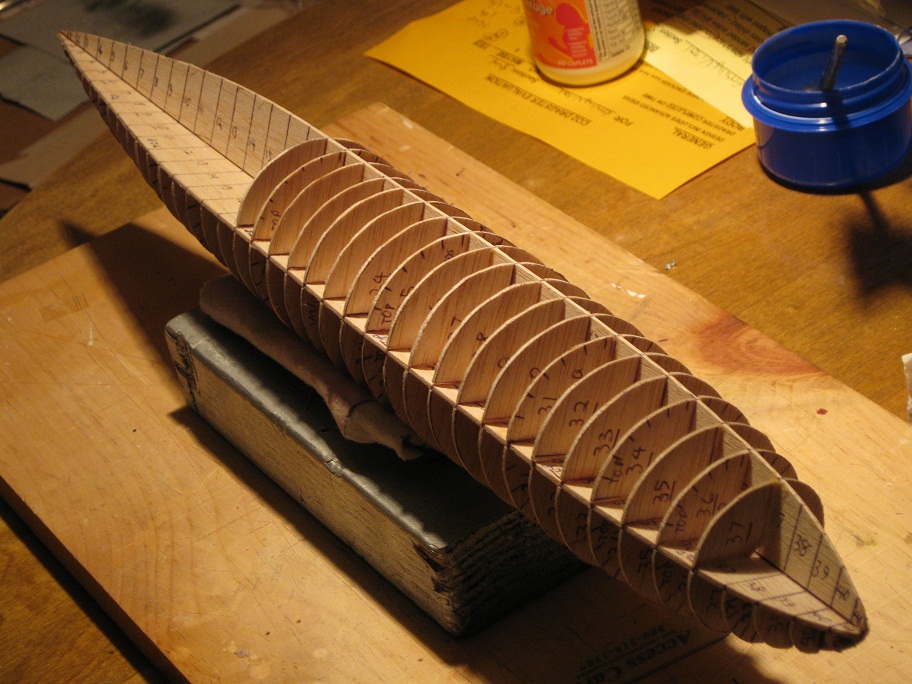
After building the first side of the hull, the second side was built in the same fashion. It went alot faster, though. The pieces were already fabricated, so other than on some of the disc quarters that needed trimmed or added to, to fit, it was just glued it together by matching up the numbers.

On about every fourth disc, I would first align them up on my ring marking template on the left, below the airship plan, to mark where the 1/16"x 1/16" longitudinal stringers were to run down the discs of the hull that give the ship it's final shape. You can see those marks on the chosen half discs laying in the ready on my reference board, to the right.
Follow along as I assemble the starboard side of the hull sub-frame in this chronological sequence of images from January of 2012.


  Remaining  half-discs ready, stacked up in order to cut in half again, to install on the hull sub-frame.


  Nose shot of the assembly.
  Completed!
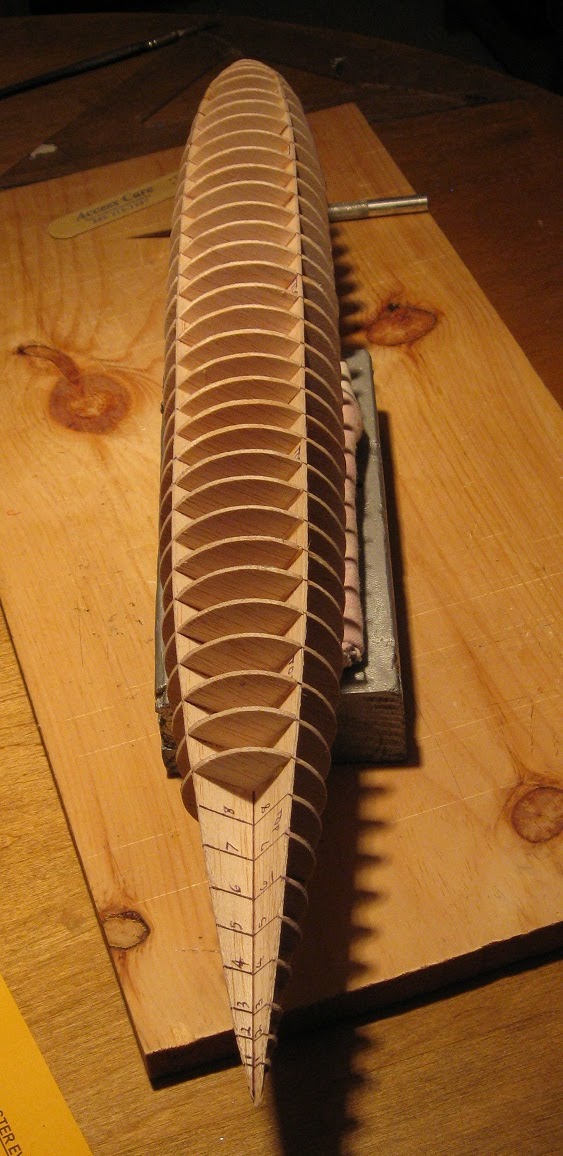
 Dead-on shot of the stern.
  Last three images show the completed hull sub-frame.
Laying on the reference plan to make sure everything is within visual tolerances, and the corresponding discs line up, and proportions look correct.
After I completed the hull sub-frame assembly, I very lightly sanded the edges of the structure to even out all the high and low spots, but being very careful not to distort the overall shape of the thing, leaving it ready to run the longitudinal stringers, (laying on the table in the upper left of this image).

Jim.

Saturday, November 17, 2012

R-34 scale model project... Measuring and cutting out the ring disc formers

The next step was to pin the vertical keel blank directly over the work plan board so I could start assembly of the model. Then I took one of the half horizontal keel blanks and glued it on the axial line of the vertical keel at a 90 degree angle. After that I started to make the former discs. I  did this by measuring the radius of each ring number on my reference drawing with a good metal compass with a ball point pen mounted in it, instead of a pencil. Pens draw easier on balsa wood than a pencil does, with alot less point pressure. I transferred the setting on the compass and drew the circles onto the balsa, cut them out using an X-acto knife with a # 11 blade in the handle, and labeled each disc with its corresponding number on each quarter of the disc. This is because each complete disc must be cut into quarters for fitting in between the horizontal and vertical keels. The mid ship ring discs were pretty much all the same size. As you got towards the nose and the stern of the model, they got progressively smaller.
 Building it on the plan board like this, you can only start out building the right side of the hull, at first.
Above picture shows me putting a disc quarter in place. Sometimes, even after precisely measuring the rings on the plan, the discs still would not fit right. They would sometimes be too big or too small. I would have to either remove material from one of the flat edges, if it was too big, or add a straight shim to one of the flat edges of the quarter disc if it was too small. All the edges of the discs must be even with the edges of the keels for the shape of the overall hull to not be "lumpy".
The rest of these images show the progression of the making and installation of the quarter ring discs to the keels of the half-hull.


This bottom picture shows the completed port side keel and former assembly, with the starboard horzontal keel, and remaining quarter ring discs laying on the table in the ziplock bag, waiting to be assembled on the other side of the hull once it is unpinned and removed from the work plan board.

Jim.

Friday, November 16, 2012

R-34 scale model project...Cutting out the keel blanks.

I started construction of this model on January 12, 2012, by mounting two full size copies of the hull plans on 1/16" sheet stock balsa wood using double stick tape, and proceeded to cut out the two keel blanks. One horizontal keel piece and one vertical keel piece. After the balsa pieces were cut out, using the ring grid lines that were marked on the pattern papers, I marked all the ring line places on the edges of the keel blanks using a Sharpie pen.
 Removing the paper patterns from the blanks, the first lines I drew on both sides of the blanks was the central axis line of the ship, dividing each blank into halves. Then I marked the "ring" lines, and marked each ring line with it's corresponding number where I would install each ring former, later.


Then I picked which keel blank would be the vertical keel "assembly", and left this intact. The remaining keel assembly became the horizontal keel , and as such, I cut this one right down the middle, so I can install one on one side of the vertical keel, and the other half on the other side of the vertical keel. What you see in the bottom picture is the ending results for that first day of construction for the model. The above picture shows me dry fitting the one horizontal keel half to the model to check that the alignment of the ring marker lines are correct, and they were.
Stay tuned.

Jim.

Sunday, November 11, 2012

R-34 scale model project...continued from Airship Modeler


In the hopes that some of the people that used to be members of what I must declare a dead forum, "Airship Modeler", and they still have this blog address, I am going to continue my "HMA R-34" project right here on my blog, once I start to work on the model again.

And now a brief synopsis of this dirigible, for people who never saw my posts about it on Airship Modeler.

HMA R-34 was a British rigid airship built in the style of a captured World War I Zeppelin type airship, built originally to bomb Germany, but it was built too late, as the war ended before the 640 foot airship could enter service. It was  completed in 1918, after the war ended. In 1919, after the airship had been fully flight tested, it was decided to attempt to make the first non stop trans oceanic flight by any aircraft across the Atlantic, by first flying to North America, then back again, after a layover in I believe New York. It was able to accomplish this by July of that year, to the jubilation of most of the free world. One of the observers on that flight was the future  commander of the airship "U.S.S. Shenandoah",  Zachary Lansdowne.

In honor of this ship's accomplishment, I decided in 2009, after I completed my Shenandoah model, to build the R-34 in this same scale, to hopefully have it completed in time for this ship's 100th anniversary of its historic flight in 2019.

The model is still not complete, but I will post earlier progress pictures of the framing out of the hull, and the covering of it, thereof. The top image shows the plan that I am working from to build the thing. The image below, here, is a photo of the ship after it landed in New York after the East to West crossing, before the layover, and refueling, and restocking to fly back.

Click on the "Jim's Junk!" title at the top of this post to see the newest and subsequent installments of this model's construction progress. Or you can also click on the "Home" button on the bottom of this post to take you there.

Jim.


Saturday, November 3, 2012

AMT's 1928 Porter from "My Mother The Car" from 1965.

Here is a relic from TV shows gone bad from days gone by. Of course, this is AMT's one time issue of the "1928 Porter", "Mother" from the Jerry Van Dyke show, "My Mother The Car" The show was based on the concept that a man's mom, one David Crabtree's, had passed away and her spirit was incarnated into this 1928 Porter, and the car comes alive. Goofy concept, for bad TV, but hey what do you expect for 1965 television? I was glued to the screen each week, as I thought this was the coolest looking car on the face of the Earth. I really thought there was such a car for real as a 1928 Porter. I knew as soon as I saw that first episode, I had to have a model of it.
Of course, this was the golden age of 1/25 scale model car kits, so AMT stepped up to the plate, and produced this kit in early 1966.
Beings that at the time, I was only eight years old, I could not yet build model kits very good, and all my attempts to build this model ended in a glue-smeared wreck. My parents got this kit for me 3 times. The last time I got it, the show was already cancelled, and off the air, and I was heartbroken, not being able to see the car gracing my black and white Motorola 25" TV screen anymore. Unlike the preceeding two kits, this one did come out somewhat fair, but still glue smeared. My parents got this last kit for my at a bulk discount store in late 1966 for fifty cents. I still, after I built it, I played with it to death, and it, too was destroyed.
Fast forward to the 1980's, when I started to play around with REAL antique cars, and I started to go to old car shows and swap meets. I started finding the old model kits, and dealer promotional models that I got, and destroyed when I was a kid, and started to build up my collection like I had back then.
In, I believe, 1983, I was walking past a vendor at the big Fall Carlisle car show and swap meet, and he had about 15 old AMT kits stacked up on his table. One of them was this beat up old 1965 AMT My Mother The Car kit box. He said the kit was 100% complete, nothing missing. I told him I was trying to find one of these for years. He said, "Gimmie $15.00, and it's yours!" So that is how I got a fourth chance to build this model again, as I still think the car from this show is cool looking.
I never realized, though, how many inaccuracies are in this kit, compared to the real car, such as the fact that AMT based their replica on a 1927 Ford Model T touring car body, instead of the 1924 model T Ford body that was actually used in creating this car. The actual car is much more lower slung than this kit is. The tires on the actual car are much fatter, are wide whitewalls, and run in much smaller diameter chrome wire spoke wheels, as opposed to the bigger stock model T's painted wire spoke wheels.
Nonetheless, this model somewhat captures the essence of the original show's car, and still is the only scale replica ever made of this car, of which only two were really built for the short lived show.
I tried to be very careful with this then 17 year old kit, and painted it up to the best of my ability, according to the original copyrighted 1965 box art and instruction sheet that came with the kit.
The model you see here, today, is the result of that effort I did in 1983, to preserve a piece of American automotive and television history. After searching the internet, these pictures here, are the only ones of this kit  that show an intact, and completed model.

"Everybody knows in the second life, we all come back sooner or later. As anything from a pussycat to a man-eating alligator. But the truth may mean my story, is more fiction than it's fact, but believe it or not my Mother dear, decided she'd come back. As a car. She's my very own guiding star. A 1928 Porter. And that's my Mother, dear. She helps me through everything I do, and I'm so glad she's here. My Mother The Car. My Mother The Car!"

To show how nuts I am about this car/show I typed this from memory.

My mom says I was, and am the only  fan of this show. I don't think so. :-D

Jim.


Friday, October 5, 2012

Star Barn 1993 scratch built.

Here is a small model I built out of posterboard and balsa wood in 1993 of this locally well known Harrisburg, PA landmark. Located along Route 283 in Highspire, just outside of Harrisburg, the structure  had been languishing for years. Built around 1872, by a well to do horse breeder and trader John Motter, this barn and its outbuildings were meant to be a showcase farm.
 North side, (View one would see from Route 283).

In the early 1990's the barn had fallen into such disrepair, that people were concerned that it would be demolished for a high density housing project, and a grassroots effort was made to "Save the Star Barn".
 South side, or barnyard side view.

There were numerous articles and fundraisers to stabilize the condition of the barn, and it's outbuildings. The owner put the place up for sale. In the meantime, in 2000, the barn was cosmetically restored by the Millport Conservancy, headed up by Robert Wolhsen, Sr. In the meantime, it was sold for a second time to the Agrarian Country, a non profit organization dedicated to preserving icons of agricultural heritage. including the likes of the Star Barn.
West gable end view.

The plans are to dismantle the barn, and move it to Grantville to be the centerpiece of a big farming museum complex. This is where we are at right now.
East gable end view. 

In 1993, during the middle of what I call the "Star Barn frenzy Years", I decided to build this model.
Northeast 3/4 view.

It is rather small. The foundation footprint of the model is only about 7" by about 4-1/2", not including the barnhill or the barnyard enclosure. I put shingles on the  roof of this model, as opposed to the corrugated metal roof the actual barn has now, as the barn originally had  a cedar shake shingled roof that would have turned quickly gray after being exposed to the weather, so that is why I painted the roof gray, as originally built in 1872.
Southwest 3/4 view.

I used a dried out ballpoint pen to heavily emboss the cardboard with grooves to simulate the siding and louvre textures of the barn's siding and ventilators.  I did the same thing to  simulate the stone foundation, and barnyard fence by embossing wavy lines on it to simulate the mortar lines in between the stones, then I hand painted it gray.
Cupola detail.


Jim.

Pensupreme and other vintage milk cartons... do people collect these?

 In the last year, I have noticed how a lot of people collect vintage glass milk bottles, which I remember when I was a kid, how the milkman...