Sunday, February 13, 2011

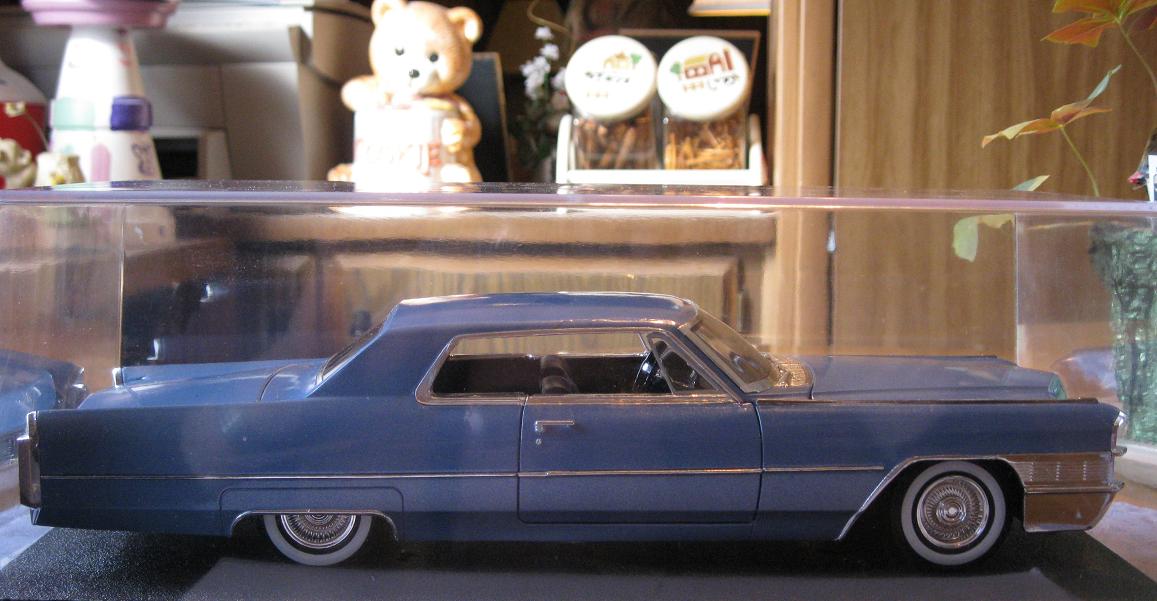
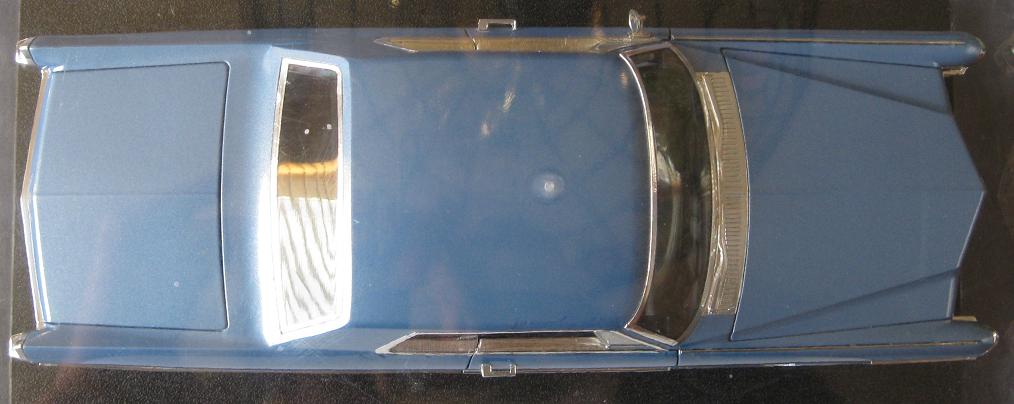
Jada's 1965 Cadillac; How it can be made more realistic.


The way this model comes in the box, it is sorely lacking in detail, both the exterior, and interior. This model, although somewhat disproportionate, and lacking in detail, or incorrect detail, for it's size, is still somewhat of a nice model. Scale models of 1965 Cadillacs are far and few in between, in the first place. So, really, when one comes along, beggars cannot be choosers. But because of it's size, at 1/18th scale, it is very easy to add the missing details to the exterior of the thing, and these items can be made very easily from scratch by modelers with moderate skills.

I used self sticking aluminum tape around the back window to simulate the moulding around it. Also, I used this same aluminum tape, trimmed to fit around the front wheel openings,to blend in with the cornering light details on the front end of each front fender. Also the rear wheel openings on the back fender skirts were trimmed out with this tape, also. In between the back edge of the hood, and the windshield wipers, I added the "chrome" cowl vent grille, which was completely missing from this model, out of the box. On this yellow model, I made this out of very heavy gauge posterboard, and I used a ballpoint pen to heavily emboss the grille grooves in the thing. Then, I cut the thing to shape to match the front curvature of the front edge of the cowl, and notched out the back edge of the thing to fit around the molded in wiper blade arms. Then I glued it on the cowl, and carefully painted it silver. The door handles were made from pieces of flat sheet styrene, the main piece 1/8" X 7/16" long, and notched out for the handle hold. Then I glued a small rectangle underneath this to complete the handle body, and on top of this small rectangle, I added an even smaller square, making that the push button for the assembly. Then I crazy glued them to the doors, and painted them silver. The door lock cylinders were made from very tiny pieces of lightweight posterboard, cut as circular as I can get them, as this piece is less than 1/16 inch in diameter to be scaled right to this car. Then they were glued to the car, right below the upper horizontal crease, and painted silver. The last thing I did was I "blacked out" the front grille. I did this by using Testors spray paint flat black, not shaken up the whole way, so it would be thinner than normal. I spray a little bit of this stuff in a small disposable container, such as a spray paint can lid, and with a medium size modelers brush, quickly paint it on the grille. I then let it tack up for about a minute or two. Then I quickly wipe the excess off the raised areas of the grille, leaving the black only on the areas behind the grille "egg crate" fins, giving the effect that the grille is actually open to the back, like the real car. Some modelers call this effect, "blackwashing", and the effect on model car grilles is very realistic. I've been doing this effect to my different model cars' grilles for years.

The first one of these models, I totally disassembled, stripped the metal body, and repainted light metallic blue in 2007, and reassembled it, detailing it out very similar to the way I did this yellow car. The only difference, other than the stock yellow color that I left on this second model, is the fact that I did NOT disassemble this one to detail it. I did this one while it was together.

I have one more of these cars still in it's "Reservoir Dogs" box, and I intend to figure out how how to fully detail the exterior, AND the interior on this one, as I have not worked on that aspect of the model, yet. The seats are shaped correctly, but are not engrave detailed at all. The dashboard is a 1964, which is a totally different dash from what the 1965, in real life actually had. I'm thinking about sculpting a new dash out of balsawood, plastic and posterboard, and then painting it to match what ever color I decide to make the interior. Hopefully, this third model will be about as close to scale perfection that I can get with this model.

For me, this model is very fun to experiment with, honing my modeling skills.

Jim.


Tuesday, February 1, 2011

Blue Jada 1965 Cadillac diecast The reason behind the work.


Model is NOT for sale.

These pictures are only meant to show that it is possible to rework, and repaint this model, and the purpose of them thereof, is meant to be informative, and reference purposes, only.


After seeing a request on my very first post on this blog, I feel I need to revisit the reasons behind why my model subjects are done the way I do things.

First and foremost, my models are not for sale.

Most of my model cars that I have posted, or will post are models of actual cars that I either have, or did have. If it is of another subject, such as my Hotel Brunswick model, I built this model because I remember this building from when I was a little kid, and I watched them tear it down in 1967. Such a beautiful building laid to waste simply because it was old.

Other subjects that I will post about later on such as a wood model of the Parthenon that I did in 1993, posterboard models that I did earlier than that, back to 1971, as well as a menagerie of different scale model subjects will be posted here. I did them all because I liked the originals of the model that it replicates in scale.

The Jada 1965 Cadillac Coupe de Ville was a labor of love, as I owned a Hampton Blue Metallic 1965 Cadillac Calais coupe for 25 years. The Calais coupe looks just like the Coupe deVille, but with narrower windowsill trim on the sides of the car. The interiors are a simpler cloth design, as opposed to the deVille's mostly leather interiors. I got it in August of 1983 for 500 bucks. It was used in our wedding in 1989. it was such a sweet running car that I really loved the design of. But when I got a chace to buy a 1957 Chevrolet Bel Air in 2006, I did not have room for the Cadillac anymore, so I sold it. I have two other old cars, now, besides the Chevy, and I still may have to get rid of two more cars. Hopefully, it will not be the Chevy, as this car is the same year as I am, hence the reason that I wanted one of these more than I wanted my '65 Caddie. The main reason I bought the '65 in the first place is I fell in love with the car's design as a seven year old in the fall of 1964, and never fell OUT of love with it.

I also have three Jo-Han models of the car. Two promos of it with one detail painted up like my real car,and one molded in blue, and I also have an original unbuilt 1965 Cadillac Coupe deVille kit.

When Jada came out with this big 1/18 diecast model, I knew that I had to do it up like my old blue '65. It was not the easiest job to do. Taking the trim pieces off was not too easy to get them off without breaking them, either. I had to use a very toxic chemical stripper on the body after the model was completely disassembled of all plastic components, and the doors, hood, and deck lids were also removed for stripping, cleaning, primering, and repainting with "rattlecan" automotive touchup spray paint. This is not an exact match for Hampton Blue Metallic, but it is close. It is a tad darker, though.

Here is a resized copy of that first image, as well as two more pictures of the model that I took later on with my own digital camera. That first image was taken with a borrowed camera in 2009.

What I really do not understand is why Jada did not produce this model in more colors besides just the light yellow replica of the car used in the movie, "Reservoir Dogs" It also is missing key details, such as door handles and lock cylinders, rear window opening mouldings, wheel opening mouldings, and most blatantly, the cowl vent grille in front of the windshield. I added these to my models, both the yellow one, and this one. The interior has a 1964 dashboard, which is completely different in design than the 1965 dash. What Jada could have made into a very impressive model for it's size, is at best very mediocre, because of it's extreme lack of detail. Fortunately, it is a very easy model for someone like me, who has been building models, and reworking models, and scratch building models for about 45 years, to rework!!

Jim.


Wednesday, November 10, 2010

1957 Chevy Bel Air 4 door Sports Sedan Hardtop 1/25 scale model.


Here is a model of my all time favorite collectible car that I have owned. This is an exact scale model of my first '57 Chevrolet Bel Air 4 door hardtop that I got by trading even up with a buddy I worked with in 1980 for a 1965 Corvair Monza convertible that I was restoring at the time, but I wanted a '57 Chevy more than I wanted a Corvair. When my dad found out that I did this, he was not too happy, and eventually he forced me to sell the car because he said "That big ugly yellow canary will never be worth anything, get rid of it or move out!!" I could not afford to live on my own yet, so I sold the car, after I spent about $700.00 more in 1980 dollars in the start of it's restoration in parts and services. I even got new floor braces, and replacement floor pans for the thing, a rebuilt 1965 Chevelle 283, a rechromed rear bumper assembly, new stock wheels, and hubcaps, and new glass for the driver's side front door. That did not matter, my dad still made me sell it, and I took a beating financially on that car, as I only got $500.00 for the thing, in March of 1983!! Needless to say I was very upset at my dad for forcing me to sell the thing. I still get upset at him for making me do this, as a restored '57 Bel Air 4 door hardtop can now fetch as much as $30,000!! I tried to tell my dad this, but he really does not even want to here it. So be it. When I came home with a 1965 Cadillac Calais coupe later that summer, he liked that car, so everything was at peace on the surface, for the time being.

That is another story for later.

After the '57 was gone, I set out to build a scale model of the thing in around 1984. I used two AMT 1957 Chevy Bel Air 2 door hardtop kits, and one Jo-Han/Ex-el products promotional model re-issue of a 1956 Pontiac Star Chief 4 door hardtop, which uses the exact 4 door HT roof that the 1956, and 1957 Chevys used in the actual cars. So I cut the roof off the Pontiac model. Then After I removed the 2 door HT roof off the Chevy body, I cut the interior hole longer on the cross panel in front of the trunk lid, by making that panel narrower, so it would accomidate the longer modified interior box. I removed the back seat coupe arm rests, and made the rear seat itself, longer, made back door interior panels, and removed the notch that the front seat had, to make a solid front bench seat back, like a fixed sedan front seat would be like. On the body, I shaved off the coupe door handles, filled in the 2 door coupe door lines, and sanded it smooth. Then I scribed the 4 door HT door lines, and sculpted 4 new plastic door handles for the car, and glued them to the doors. After that was done, I glued the Pontiac 4 door roof on, tweaking it quite a bit to get it to fit. Next, I dry fitted the "glass". After that,I dry fitted the new interior box. After I got everything to fit satisfactory, I did all the paint work, and was able to assemble the rest of the model, as per the stock AMT kit's instructions. Oh, yeah, on the front grille, I cut out the grille top bar, and attached it to the hood, like the real car is done.

Even though, I did this model 26 years ago, now, I think it still came out really nice, considering all the work I had to do to the thing to get the results I wanted . And that is a scale model of a 1957 Chevrolet Bel Air "Sports Sedan" 4 door hardtop!

Please check out this new update post I did about this model, as you the viewer have made this my most popular post, so I decided to do new photos of the model, and more info on how and why I built it.
Here is the link.

http://jayveejayaresjunk.blogspot.com/2012/08/1957-chevy-bel-air-4-door-sports-sedan.html

Addendum;  February 3, 2013.

To the  people of the '55-'56-'57 Classic Chevy Club France, I sincerely thank you for your kind remarks on your forum. I wish I knew French so I could join your forum and talk more about this model, which I built 29 years ago in 1984. I am thinking about building a second 4 door hardtop in India Ivory and Canyon Coral (pink) as I now own a real one in this color scheme. Your remarks, again are much appreciated!--Jim.

Jim.


Tuesday, November 9, 2010

1969 Buick Electra 225 coupe 1/25 scale model "half & half" scratch build.


Here is a model that I actually built before I built the model of the green Electra coupe on my last post. This is a scratch built model of my 1969 Buick that I got in the spring of 1978 to replace the green '65 that I was driving.

This model entailed the use of an AMT 1969 Buick Wildcat kit that I had to very highly modify to turn it into a 1969 Electra coupe. From the back edges of the doors to the back bumper, inclusive, including the back half of the roof is entirely made out of carved, and sanded to shape balsa wood. This was not an easy job, as the Electra's back end is a completely different shape than the back end of the Wildcat, but the front of the car is basically the same. The front grille had to be cut out of the front bumper frame assembly, as the Electra has an egg crate style grille, whereas the wildcat has a more linear grille. I also had to cut the headlight assemblies from the Wildcat grille, so I could glue them to the Electra grille, which I made from small pieces of aluminum screening, which I then painted silver to try to hide the woven look of the screen mesh, to try to make the squares look more like a flat surface. On the front fenders, behind the wheel openings, I had to file/sand off the Wildcat "louvres" that were there, and replace them with the Electra quad portholes that are above the "sweep spear" moulding line above, and behind the front wheel opening, but in front of the door. The portholes are made out of thick gauge paper, as are the wide rocker and quarter panel mouldings that are on the model. The rear window "glass" is acetate. Before I painted the body, I sealed the balsa surface with balsa sanding sealer, sanded it again after that, and repeated until I got the wood surface as smooth as I felt that I could get it. Then I scribed the lines for the rear fender skirts, and the trunk lid. Then I attached the trim, ready for paint. The body was then detail painted, then, I was able to assemble the model normally using the rest of the parts that the kit came with.

This model is FAR from perfect, but it is a model of one of the cars that I drove in my early years. Why model manufacturers ignore the Electra 225 , I do not understand!! It is one of the most consistently beautiful cars, year after year, that GM ever built. Long live the "Deuce and a Quarter"!!

This model was custom built in 1979, when I was 21 years old.

Jim.

May 24, 2011-- P.S.- I just found the negative to what I thought was a lost picture of me with my 1969 Buick Electra 225 Custom coupe taken in May of 1978. I'm 20 years old here.--- There is also another reprint of an old picture from the same negative strip of the actual car that I had, parked along the street in Lancaster PA, where I grew up. Also, I added three more images of the model that I took at the same time as the other pics of the model, but I never posted them, until now. JRVJR.


Pensupreme and other vintage milk cartons... do people collect these?

 In the last year, I have noticed how a lot of people collect vintage glass milk bottles, which I remember when I was a kid, how the milkman...