Jim.
Sunday, April 13, 2014
R-34 scale model project... Almost there, but not quite.
Here are some teaser pictures for now. Yesterday and today, I finished all the detail work to the cars, made and attached the propellers, and permanently glued the cars to the ship. Now that remains to be done is the rudder and elevator flap as well as nose and tail cone "Bullseye" red white and blue paint work, and the decals. After that it can be sealed and called done.
Jim.
Jim.
Sunday, March 23, 2014
R-34 scale model project...Refabricated the aft car!!
I had to start from scratch, today all over again , as far
as the aft engine car goes. It seems that after I was done mocking up the model
with all the cars in place, that something did not look right. Here, compared
to the wing cars, the aft car was too small, so I had to totally make a new one
for the model. The aft car on the R-34 is the same height and width as the wing
cars, but since it has TWO engines front to back in it, driving one 17 foot
diameter propeller, the car is about 25 percent longer than the single engine
wing cars. So I made a new one in the appropriate bigger size. NOW the model
looks balanced, and aesthetically correct. All the cars were then refitted, and
the model was checked for overall alignment and proportion correctness of the cars,
keeping on tweaking until I felt happy with how the model airship looks to me.
The cars are now ready to have the woodgrain in them sealed, to get them ready
to spray paint silver, and then top dull clear coat them before the window and
door details are applied. Then and only then can they be attached to the hull
permanently. I guess I should actually fabricate the four propellers, paint
them and attach them to the cars before I glue the cars to the hull beforehand.
That is where I'm at right now. Here are pictures of the model with the
corrected aft car in place and all dryfitting of all the cars to the hull
completed.
Jim.
Saturday, March 22, 2014
R-34 scale model project... All cars completed!
As the title says, I finished fabricating the wing cars,
today, completing the set needed for this ship. It took a while to dry fit them
so that they hung half decently below the hull. I also permanently placed the gondola locator pins in the hull
in their appropriate places for positively locating the completed painted and detailed cars later.That is what is next.
details such as making the window, hatch, and
door decals after the grain is sealed and sanded, then painted. Here are
the pictures showing the control car and all three engine cars in place. Model
is really taking shape, now.
Jim.
Tuesday, March 11, 2014
R-34 scale model project...Dry fitting control car to the hull.
Here are the latest progress photos. I just got done dry
fitting the completed control car assembly to the hull. I need to apply sanding
sealer to it, then ever so lightly sand it before I can paint and detail it. I
just installed all the hull mounting struts and the two ladder tubes to the
car, yesterday. But next, I have to make the other three cars. The aft car, and
the two wing cars. I will do them next before I seal and sand them all before I
paint them and permanently glue them to the hull. the way this model looks,
now, except for the color, I could make this thing into the L-49, if I wanted
to, instead of the R-34. the ships look so similar.
With the rudder and elevator flaps dry fitted to the fins, as well as the control car, the final profile of the dirigible is starting to emerge.
These last pictures I just now added, shows the newly fabricated aft engine car assembly dry fitted into place on the hull of the model. The only major pieces left to make are the two mid ship's wing engine cars. Those will be next. I also fitted what I call the "ram air tubes on the sides of the cars that I think were a combination for the cooling of the engines, and what not. The aft car has two of these, one on each side of the gondola, as it has two engines in it that drove the one propeller in that car.
Jim.
Monday, February 3, 2014
Paper Landmarks Parthenon card stock model kit; Not for the faint of heart modeler!!
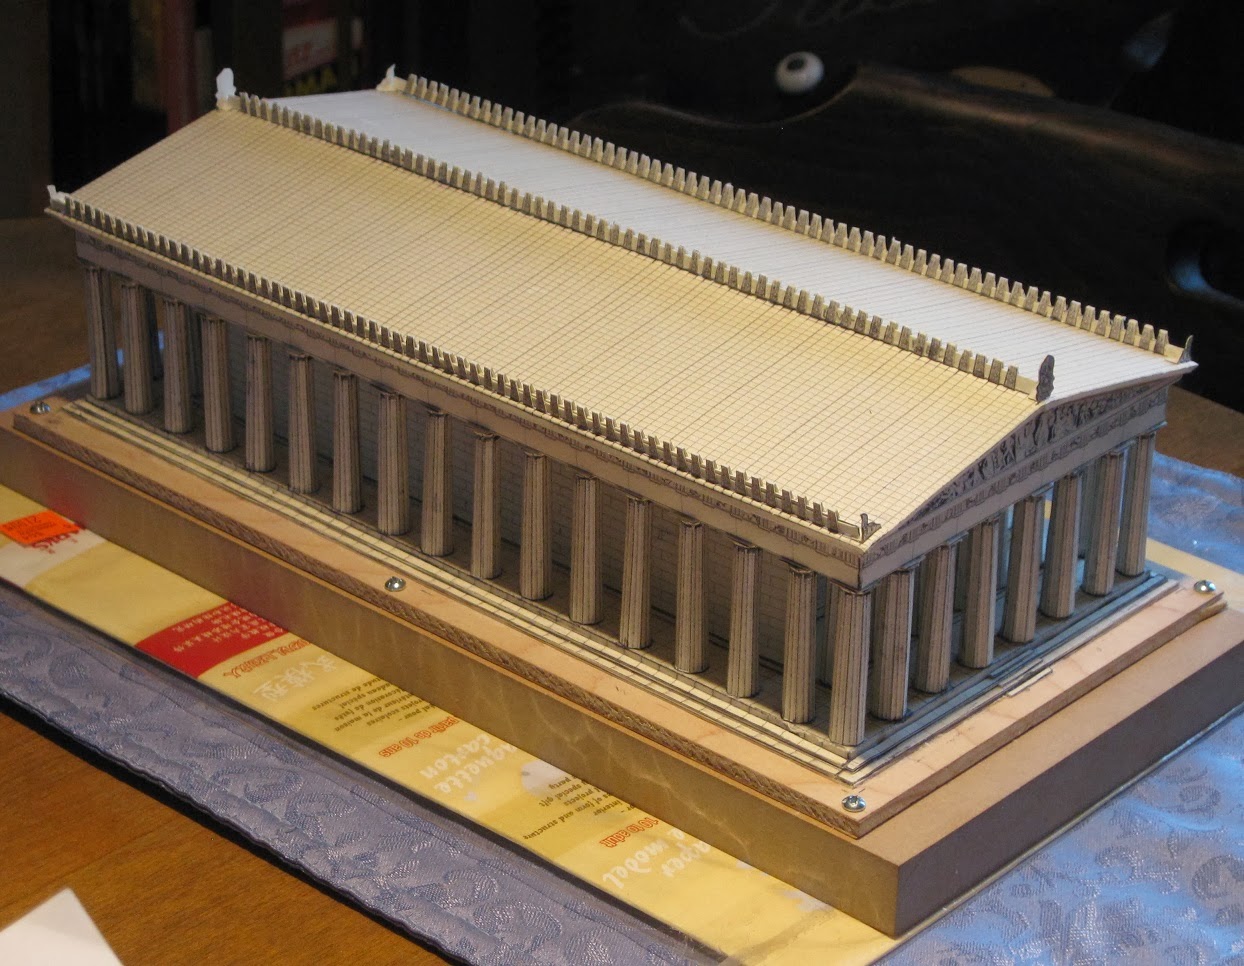
For about the last three weeks, I have been working on an
imported paper card stock model kit of the Parthenon from Latvia. This has been
one of the most intense and at times a frustrating model, as some of the 400
plus parts this kit has are very tiny and must be cut out scored and folded
very precisely before the model can be glued together, using white glue. The
main problem is keeping the whole thing from warping out of shape as I put the
thing together. But my patience is starting to be rewarded as the model is
starting to come out nicely in what is the final assembly stages...
This is one of THEE hardest card stock models I have
attempted to build. A little frustrating at times. That is when I stop and let it sit for a couple of days to
refresh my brain to keep on going. The instructions that came with the kit are
really very poor, and is really only showed in two poor general overall blowup
pictures of the sub assembled folded up parts
being assembled into the main model. They do not even show how the
individual parts themselves are folded up to be assembled. Alot of the pieces, you really have to just
sit, and study the two exploded view drawings of the model, then study the
actual printed part on the paper sheet before you cut out, score for folding,
and glue together the piece.
Models of this type, I have designed and built a few,
myself, and they are a passion of mine.
The packaging says you can build it in 8 hours. Baloney!
This model is so complex, I believe I already have more than two times that
amount in it already!! And I consider myself to be a seasoned modeler with
close to 50 years experience. This is DEFINITELY not a model for the inexperienced
builder. I'm having a bear of a time with it, but it is still fun, and I love a
challenge!
After over a three week time period, I easily have about 30-35 hours labor time in this thing. That is, cutting out, scoring the parts, folding them, then gluing the parts together. Then after enough parts are together, you can take those parts and start to assemble the model in steps. Some of the parts were so tiny that I had to have a 100 watt work light aimed at the work board so I could see clearly what I was doing, with my strongest bi-focals on, after a while, my eyes and brain still went wonky on me at times. That is when I would quit for the day and continue to work on it a day or several days later. But other than some minor warpage issues, which I think I was able to correct, I think this model came out beautiful.
To sum it up this way, this is NOT a model for a beginner to
try out. Especially with the 400 plus parts the thing has in it in total. The
kit says it has 383 parts total, but the 23 inner upper level pillars in the
naos where the Athena statue is at, did not have capitals, so I made those out
of scrap paper that was left over from that days work and glued them on to the
tops of those pillars. The model came out FAR from perfect, but at least I was
able to get it to come out.
Select pics of the 1/250th scale paper card stock model.
Looks pretty real, don't it?
The Parthenon was/ is quite the beautiful building back in the day and even now, as a ruin. This building is so beloved that a community leader in Nashville, Tennessee, decided in 1897 to replicate this building full size as it was back in the 430's BC in Athens. It is the only structure of its kind on the planet, other than the original in Athens, Greece, and it is quite spectacular, to say the least.
I have unscrewed the model from the heavy MDF particle board
that it was mounted to to keep it from warping as I finished the final assembly
on the model, and it worked. The model is no longer twisted like it was when
I started it. I had mounted the model
itself directly to a piece of 1/4" drawer box bottom plywood to try and
stop the warping, but that did not work, so that is when I screwed the whole
get-go to the high density particle board, which is absolutely impervious to
warping, and it will hold a true flat plane forever, as long as it is not
directly exposed to liquids.
Anyhow, after I unbolted it, I had to take the whole model
to work to trim the plywood base down surrounding the model on all four sides
on one of our industrial table saws, so that the plywood base looks like a
fourth step. The proportions of the model with that extra step looks fantastic.
I intend to laminate the excess blank paper that was left over from the kit to
the exposed plywood edges to make the base look like a part of the model, in
the form of that fourth step. Pictures will follow after I'm done doing this.
The plywood has about an eighth inch reveal all the way around the model, now.
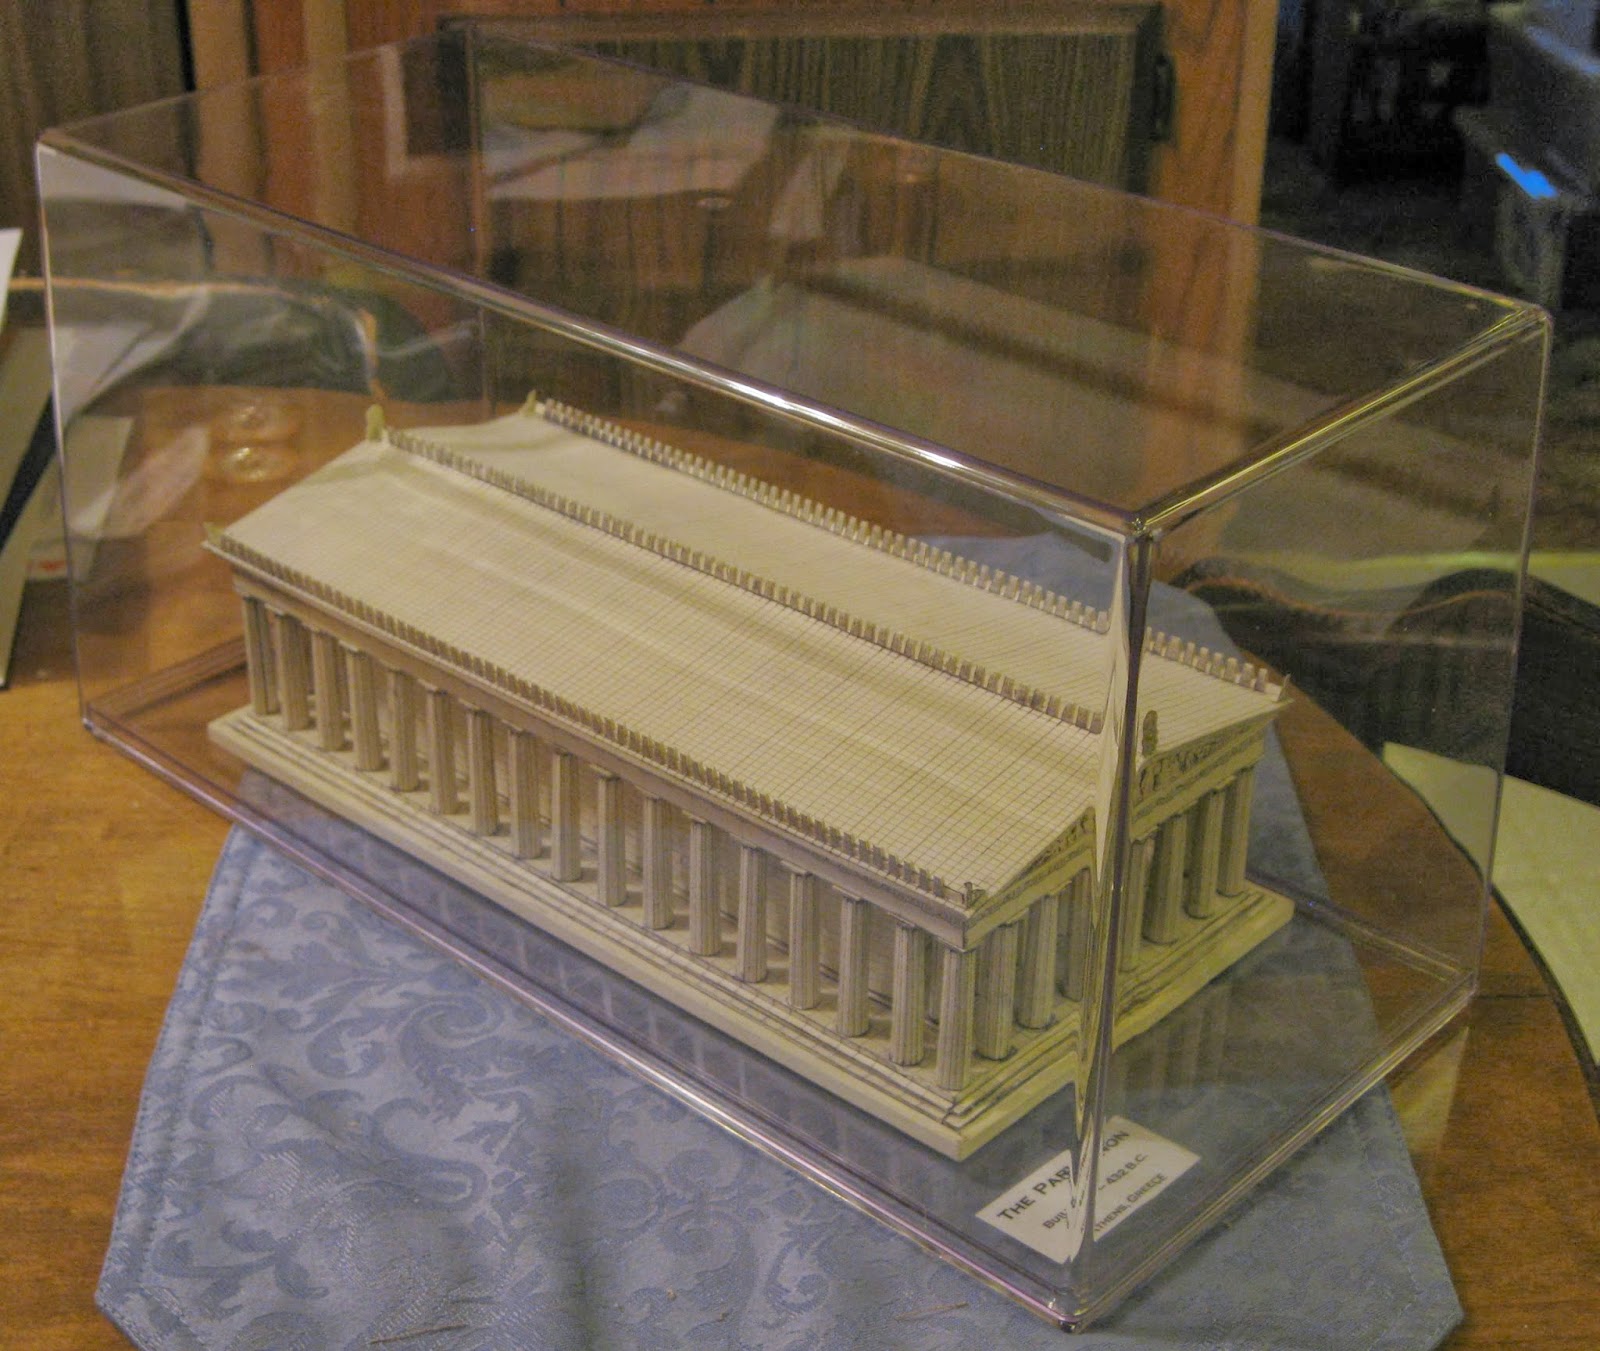
Heavy 15 inch long molded clear acrylic (plexiglas) display
box protects the model from dust, moisture and impact damage, now. This box is
much more resilient from impact damage than the clear polystyrene display boxes
they make for model cars. The model is secured to the display box base with two
very short flush head sheet metal screws.
As I suspected, A C Moore had these in stock in several
sizes, and this one was the only one in stock big enough to fit my model.
East end pediment view of model in display box with model identification tag that I printed out for it.
I'm planning on doing another one of these Parthenon kits...
not happy how this one came out. I ordered two more of these kits from a place
that has them in California.
Because the instructions do not give an assembly order
sequence that is specific enough for this model, there are some parts I had to
specifically modify and/ or purposely damage to get them to fit. With the
experience of building one under my belt, this second model when I do it will
not only come out better, but I'll probably be able to do it in about
two-thirds of the time it took me to do this one. I know EXACTLY now how the
order of assembly needs to go now in order for the thing to come out not warped
and twisted. You know the old saying,"Hind sight is always 100%".
This second model, I will not feel like I am "stumbling around in the
dark" so to speak like I did with this one.
Jim.
Friday, January 24, 2014
A plastic model Parthenon? Yes, really!
Just got this "new" plastic replica of the
Parthenon, direct from Athens, Greece through an eBay auction my son did for
me. This little model is only about 6" long but the detail in it is
incredible. You can make out the relief sculptures in the surrounding
architraves and the statues in the pediments, the detail is that good. It also
has a little view-master feature. You look through a little lens on the one
pediment, and you push a little button on the bottom, and you can view 8
different pictures of different ancient historical ruins around Greece. Cool
little replica was made in the 1960's, as the seller says in his eBay auction.
He still has a couple more left to sell.
As you can see in these photos, the engraving details that were put into the molds of this model are fantastic in recreating the pediment and architrave friezes. Again , I say for the small size of this model the detail is unreal. I guess that has to be expected as this model was made in Greece, the country where the actual 2,500 year old buiding still stands, today in Athens.
The little six inch long model fits perfectly inside a 1/24 scale model car display box that I bought for it. I have it tied in place using white natural twine so that there would be no chemical reaction in between the twine and the 50 year old plastic of the model. I did not want to damage the model in any way be gluing it to the display box base or drilling holes in the model base itself to secure it. So I passed the twine through the front and rear porticos between the pillars, through flanking holes in the display box baseplate on either side of the model's base, and tied the twine together on the bottom side of the display box baseplate, securing the model gently, but securely. Model is now protected from dust and impact damage, but yet is still viewable.
Jim.
In this picture, I have the model sitting on top of the original cardboard box that it came in new. The model was originally probably sold as a souvenir at the acropolis museum in the mid 1960's. This is the most detailed ready made replica of the Parthenon intact, that is as it was originally built that was made, in my opinion. That is, as opposed to the ruin that remains of it, today.
The little six inch long model fits perfectly inside a 1/24 scale model car display box that I bought for it. I have it tied in place using white natural twine so that there would be no chemical reaction in between the twine and the 50 year old plastic of the model. I did not want to damage the model in any way be gluing it to the display box base or drilling holes in the model base itself to secure it. So I passed the twine through the front and rear porticos between the pillars, through flanking holes in the display box baseplate on either side of the model's base, and tied the twine together on the bottom side of the display box baseplate, securing the model gently, but securely. Model is now protected from dust and impact damage, but yet is still viewable.
Friday, January 3, 2014
USS Shenandoah scale model project completed 5 years ago this year.
This coming March will mark the fifth anniversary of my completion of this scratch built model of the U S Navy's first home built rigid airship Shenandoah which was completed in 1923 but was destroyed in a thunderstorm on September 3, 1925, with the loss of 14 of the 25 lives on board. The 21-1/2 inch long model is 1/388th scale. It is made of balsawood and covered with doped tissue paper. The actual airship was 682 feet long.
The model is aging very well without problems, as this is a new photo that I took of the thing, today.
Jim.
Labels:
1923,
1925,
airship,
Ava Ohio,
control car,
dirigible,
helium,
Hindenburg,
hydrogen,
Los Angeles,
Luftschiffbau,
Rigid,
scale model,
September 3 1925,
USS Shenandoah,
wrecked,
Zachary Lansdowne,
Zeppelin,
ZR-1,
ZR-3
Subscribe to:
Posts (Atom)
Pensupreme and other vintage milk cartons... do people collect these?
In the last year, I have noticed how a lot of people collect vintage glass milk bottles, which I remember when I was a kid, how the milkman...
-
Being off work and under self isolation due to corona, and upon hearing that Land-O-Lakes is dropping Mia, the Native American maiden ...
-
Post Script; I no longer own this car. I sold it today, December 3, 2021. A new owner is taking it to Northern North Carolina as I type this...
-
Here is a car that I owned for almost a whole generation. It had everything. Great looks, good handling as well as performance. I owned this...